Sunday, June 16, 2013

The Metabolic Efficiency Profile will test your energy and hydration requirements during sustained exercise

Here is a sample Metabolic Efficiency Profile report at the Fit Stop Human Performance Lab 

Energy Utilization Chart
Your report (date, 2013)

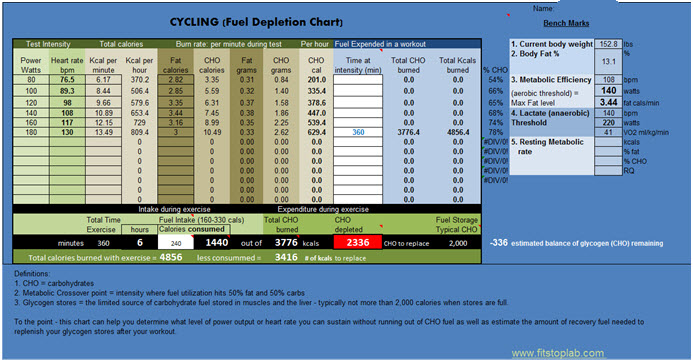
During your sub-maximal 30 minute bike test we determined that your ideal power output to spare carbohydrates with optimized fat burn is between 140-180 watts (HR between 108-130 bpm).  At wattages above 200 the utilization of fat is very minimal. Although fat utilization is apparent at 180 watt ranges… the high overall expenditure rate may lead to early depletion of stored carbohydrates (CHO) during continuous long bouts of exercise.


To evaluate energy needs and potential depletion problems I have provided various time at zones scenarios in the following charts – as determined from your Metabolic Efficiency Profile (MEP).

Energy Utilization Scenarios
Full 6 hours/day
The table below represents your energy response if you were pushing near the power output of 180 watts (zone 3) for six hours. Note: negative 336 carbs after ride = potential depletion problems


The next chart represents if you were pushing near the power output of 140 -150 watts (zone 2 heart rate) Note the 758 kcals CHO remaining.  It is easier here to keep your carbohydrate stores in the optimal levels.


The table below represents a range of zones from the 140 to 180 power output (108-130 HR). Here we have 208 kcals of CHO remaining.


30 on / 30 minutes off (during RAAM relay)


NOTE: this determination is based on you ingesting 120 kcals during your ride.  You may choose to focus on hydration during the ride (and after) while focusing on fueling during rest periods. 
Also note:  these determinations do not factor in your fuel intake during rest periods – which will pay a large role in replenishing glycogen.  However, these scenarios – when played out over multiple days, show how it may be difficult to keep up with fuel replacement when intensity is too high.  So be sure to stay in the sustainable zones 1-2 if possible.

Notes on your energy intake requirements
The calculated estimate for your suggested energy replacement during exercise lasting more than an hour is listed to the far right of the grams of carbohydrates every 20 minutes (see below). A more general recommendation is to consume approximately 30-60 grams (i.e., 120-240 calories) of carbohydrates every hour.  Sixty grams is usually the highest amount most endurance enthusiasts can assimilate in an hour or about 30-50% of your actual expenditure. However, some endurance athletes have acquired the ability to consume over 100 grams or 400 calories every hour without bloating or suffering other signs of digestion diversions in blood flow to the stomach. 

Within 1 hour after exercise consuming protein in combination with carbohydrates in approximately a 1:4 ratio (1 gm of protein for every 4 gms of carbohydrate) has shown to speed up the glycogen restoration and muscle recovery. Try to consume between 100-200 grams of carbohydrate within 1-2 hours after exercise (more specifically 1.5-1.6 gm or carb per kg of body weight).
Below are your exercise fuel intake recommendations according to your body weight:


Notes on your hydration requirements
Don't wait until you are thirsty to start drinking. By the time you experience the sensation of thirst you could have already lost up to 2-3% of your body weight from water. Only a 2% reduction can cause significant performance losses and over 3% can lead to heat exhaustion and even heat stroke.

During exercise, studies show that different individuals lose more water faster than others in similar environments (hot, cold, humid, etc.). It is quite individual. So the recommendation for fluid intake during exercise should be determined according to how much water weight you typically lose during your exercise.  If you lose 2 pounds of weight during a 1-hour exercise bout then you should be trying to replace a similar amount during your exercise activities. For each pound of body weight you lose you will want to try to replace it with 16 ounces of water. See your Sweat rate report below:


The information in the above chart represents your sweat rate and the resultant hydration and electrolyte requirements when riding at moderate temperature.  This was a 5 hour local ride.

NOTE: Your sweat rate per hour was 24.8 ounces per hour or 12.4 ounces per half hour which would be your fluid intake goal for each half hour ride.  The electrolyte requirements are listed on the per hour rate.  Cut those in half for the 30 minute ride.

Use your body weight as your metric to determine if you are reaching your hydration needs.

Other Hydration Recommendations to consider

2-3 hours prior to exercise, drink approximately 16-20 ounces of water.
·       10-20 minutes before exercise, drink approximately 10 ounces of water or sports drink.
·         During extreme conditions your hydration requirement per hour can be as high as 34 ounces.

       To determine your individual sweat rate and hydration needs in various conditions – go to http://www.fitstop-lab.com/tools/sweatratesheet.xls  

      Subtract 1 lb for every 16 oz of water consumed during time trial. Once you have confirmed total weight loss, you can then correlate each pound lost with the following loss in electrolytes:
  •       220mg of Sodium
  •       63mg of Potassium
  •       8mg of Magnesium
  •       16mg of Calcium
Electrolytes  Recommended electrolyte supplements
      o   http://www.saltstick.com/
      o   http://nuun.com/products

To evaluate your energy expenditure and fuel requirements during extensive exercise training go to http://www.fitstop-lab.com/Metaboliceff.htm or http://www.fitstop-lab.com/fitnesstesting.htm for more testing ideas at the Fit Stop Human Performance Lab


Tuesday, May 14, 2013

Finish Stronger by maximizing your Economy

Your "economy" or mechanical efficiency (ME) links your sustainable power to your actual performance work rate, velocity or speed.  The better the ME the greater the achieved velocity.  

Your ME is determined by measuring the volume of oxygen taken up by your working muscles at a given sub-threshold exercise intensity. For example, during a bike test your VO2 consumption at a standard power output can be used for comparison. A reduced volume of oxygen at the same power output after repeated testing would suggest an improved oxygen economy and improved performance potential.

At the Fit Stop Lab we measure ME during the Cardio-Metabolic Exercise Profile (CMP) by comparing your actual VO2 ml/kg/min measured at your anaerobic and aerobic thresholds with the predicted VO2 through calculations using the power output. 

We also measure Efficiency and Economy during a 20-minute sub-max exercise test called the Exercise Economy Profile. This test is conducted a couple of days after the CMP and requires performing a 20 minute continuous bike or treadmill test at 80% of your VO2Max.  

Outcomes from the EE Profile include:

GE = The Gross (Mechanical) Efficiency is the ratio of work accomplished to energy expended which describes whole body efficiency. Normal fit cyclists are typically around 20% while Pro Riders average closer to 25%.

EE = Cycling Economy or Running Economy refers to the actual power output generated at a cost of 1 L of oxygen (L= Liter). Highly trained amateurs cyclists generate approximately 75 W/L/min where as the pros are measured in the 85 W/L/min range.

VO2 drift = is commonly referred to as the VO2 slow component. Endurance performance can be enhanced by training to decrease the magnitude of the slow component. World class cyclists show increases of VO2 less than 130 ml over 20 minutes at a work rate of 80% of VO2 max. Unfit or normal fit cyclists will show 3-4 times this amount of drift for 20 minutes at the same relative intensity.  This assessment is a good indicator of how well your aerobic base has been established (or not). Specifically, when you have established a solid aerobic base you will see that during a sub-threshold (below AT) intensity (often best measure is near or at the AeT) the VO2 or heart will maintain a steady straight line consistent with the workrate (i.e., pace or power at AeT).  This is often referred to as "coupling." For more information on coupling check out Joe Friel's article

Here is an example of a 20 minute economy test


For more information on fitness testing at the Fit Stop Human Performance Lab go to http://www.fitstop-lab.com/fitnesstesting.htm.

APPLICATIONS

1. For endurance athletes and enthusiasts the benefit of understanding and evaluating your economy is that you can learn to maximize velocities at lower energy expenditure levels by focusing on the appropriate energy systems in training (e.g., zone training).  The right training effect can lead to a faster pace and better conservation of fuel at that pace, while limiting recovery problems.

2. For those individuals who are focused on weight management or more general health and fitness goals the benefit of understanding your economy is two-fold. One, by repeating over and over again the same activities or exercises can lead to mechanical efficiency's that will limit your calorie burn potential.  For example, walking the same flat route over and over again will promote a very efficient walking economy which will lead to faster pace but potentially lower calorie burn.  There is a need then to mix up your routine and the types of exercise.  Two, on the other hand if you plan to go on extensive hikes or other long endurance activities you would like to optimize your economy for that event so that you can finish strong, no matter the distance.

Monday, September 24, 2012

Off-season training (Part 1) Rest & Repair

The off-season, which for many athletes and enthusiasts starts in the fall or winter, is the time to regenerate all those body systems that have been working overtime all season long. Regeneration can include taking just a few days off to start with, followed by just enough training that you can create an effective balance between recovery and maintenance. Generally most athletes will spend about 4-6 weeks in this "transition" phase which includes lowering the training volume just enough to prevent a significant loss in fitness. The goal would be to try to maintain at least 50-60% of your current fitness so that you won't need to start from scratch next season. Many athletes choose to spend time doing other modes of training (e.g., cross training), something completely different, even to the point of avoiding their typical in-season training mode(s). Additionally, the transition phase is a good time to put a greater focus on your event limitations (i.e., your limiter). For example a triathlete may decide not to spend much or any time swimming or riding during the transition and focus primarily on the techniques and drills to improve thier stride efficiency on the run. Finally, the off-season is a great time to practise recovery techniques. Some examples recovery techniques include: post workout fueling, foam roller exercise or self massage, stretching or aqua workouts. See some recovery recommendations at http://www.fitstop-lab.com/halfmarathon/Recovery.pdf.

Stay tuned for Part 2 on off-season or transition training.  The topic: Stimulus Adjustment

Saturday, September 08, 2012

Wednesday, August 22, 2012

Zone 5 (Anaerobic endurance)


High intensity repeats to develop anaerobic endurance, speed and/or power.
Zone 5 or higher is ONLY for highly conditioned individuals. Training in this zone is performed for shorter periods of time (3-8 minutes) with adequate 1.5 x the duration for recovery time (HR returns to zone 1) in between intervals. This zone is used sparingly, usually not more than once a week or every 2 weeks. Heart rates are monitored in the recovery intervals to assure full recovery back to baseline before continuing additional hard intervals.

100% of your maximum heart rate (MHR) or
15+ beats above your AT or >105% of your heart rate at Lactate threshold (AT)
This work-rate (power or pace) is typically 106-120% of the power or pace at AT
A rating of perceived exertion (RPE) between 6 and 8. High discomfort. Close to your all out pace for up to 15 -30 minutes (anaerobic endurance).

Sample Zone 5 training sessions:

Running (these can be modified for use on the stepper and elliptical machines)
  • Hill intervals on a 5-10 % grade. Do 4-5 x 3 minutes up in zone 5 and 3 minute recoveries.
  • Speed intervals. For 5K preparation, repeat 4-5 x 200-400 meter distances at race pace.
  • Track. Warm up +4 strides. Then 200, 400, 600, 800, 600, 400, 200 (recover for 50% of interval time). Alternate 3K-5K pace. Long easy cool down. Hint: 3K is about 5 sec faster per 400 than 5K.

Cycling
  • Hill intervals on a 5-10% grade. Do 4-5 x 3 minutes up in zone 5 and 3 minute recoveries. 70+ rpm’s
  • Time trial intervals. 3x10 km building from CP30 to CP12 on each interval (5 minute recoveries). Flat to slightly rolling course. Challenge yourself with big gears. On time trial set-up. 85-100 rpm. 
FINDING YOUR ZONES
If you are unable to get tested in the lab you can estimate your zones by going online to…

Lactate Threshold Tester (estimator) at http://www.fitstop-lab.com/tools/intensityindex.htm or 
I can help you set-up your zones online at http://www.fitstop-lab.com/CMSpro.htm


Zone 4 (Supra-threshold)

Anaerobic (Lactate) Threshold or Cruise Intervals – This zone will build metabolic fitness (i.e., a higher lactate threshold) and enhances one’s ability to sustain hard work & a faster pace or higher power output. In Zone 4, significant levels of fatigue, as represented by increases in lactate, are produced while not at a rate that overwhelms your energy systems. Zone 4 sessions should always be separated by a recovery period of 2-3 days to assure optimal recovery and then compensation from this training overload. Ultimately, both athletes and fitness enthusiasts (including weight watchers) can benefit from appropriate Zone 4 training.

A rating of perceived exertion (RPE) between 4 and 7
92-98% of your maximum heart rate (MHR) or
5-10 beats above your LT or 100-105% of your heart rate at Anaerobic threshold (AT)
Forceful breathing and an all out effort to sustain pace up to 1 hour.  

Here are some example graphical depictions of zone 4 interval session:

Step-up to zone 4 = Just starting? Follow this interval step up pattern to adjust to the new zone 4 intensity.  An early program might suggest you build to a the peak zone 4 heart rate for 1 minute then drop the workload to starting level for two-five minutes, check your heart rate during the recovery waiting until HR returns to zone 1 or 2 before starting next climb.


Higher fit = Long intervals. Adjust intensity of exercise to maintain work-rate (pace or power) in Zone 4 for prescribed interval duration (2-20 minutes). Objective here is to increase metabolic fitness (i.e., lactate or anaerobic threshold increase). Benefits include higher maximal steady state and increased sustainable pace or work level. For a smart and effective progression add 1-2 minutes to each up-interval every week (see sample progression).


Higher fit = Fartlek comes from the Swedish word meaning 'speed play'. This form of training involves alternating fast and slow speeds during a session. Most references suggest the use of undulatiing terrain and a lot of variety as the key aspects of this type of Fartlek training. The actual amount of fast and slow speeds (high & low intensity) is left up to the exerciser and how they feel.


Sample Zone 4 training sessions:

Running (these can be modified for use on the stepper and elliptical machines)

  • Long repeats 1600 meters (1 mile) x 3 in Zone 4 with recovery for the same time it takes to do repeats.
  • Tempo intervals (race pace)
    • 10K = 400-1200 meter repeats with equal or 1 ½ time in recovery between repeats
    • ½ marathon = 400-2000 meters with equal time in recovery
    • Marathon = 800-3200 meters with equal time in recovery
  • Steady state intervals (10-20 min.) on road or with long steady climbs or tempo (race pace) workouts at 10K pace.
  • Fartlek training for 20 minutes (2-4 intervals).
  • Crisscross threshold training. Choose a flat course. Warm-up and then run 20 minutes in zone 4.
  • Crisscross from low zone 3 to high Zone 4 every 1-2 minutes.
  • Step-ups. Warm-up, building to Zone 3 heart rate. Hold for 15 minutes. Then step-up to Zone 4-5a heart rate for 5 minutes. Relaxed form. Cool down.** (Note 5a = first 5 beats into Zone 5).
Cycling

  • Cruise intervals on road or trainer. Do 4-5 sets of 5-10 minutes in Zone 4 with 2 minute recoveries. Smooth pedaling, 80-90 rpm’s.
  • Threshold or Tempo ride for 25-60 minutes steady in zone 4. Non-stop. Flat course on your time trial set-up. Smooth pedaling – 85-100 rpm’s.
  • Crisscross threshold training. Choose a flat course. Warm-up and then ride 20 minutes in zone 4.
  • Crisscross from low zone 3 to high zone 4 every 1-2 minutes. 85-100 rpm’s.


FINDING YOUR ZONES
If you are unable to get tested in the lab you can estimate your zones by going online to…

Lactate Threshold Tester (estimator) at http://www.fitstop-lab.com/tools/intensityindex.htm or 
I can help you set-up your zones online at http://www.fitstop-lab.com/CMSpro.htm


Monday, August 20, 2012

Zone 3 (Tempo)

This zone is at or just below anaerobic threshold (AT). Zone 3 training helps to improve or enhance cardiovascular fitness while optimizing overall calorie expenditure. This is an ideal zone for increasing fitness and endurance performance. This zone represents a moderate to high exercise intensity level where slight increases in the anearobic threshold and enhanced aerobic energy pathways are included in the training effect. Here aerobic and metabolic fitness (muscle endurance) are improved. Exercise in this zone will focus on maintaining a maximum steady state workout that can include tempo workouts and long intervals. With an appropriate progression plan, these max steady state levels can be maintained for 20-60 minutes.

A rating of perceived exertion (RPE) between 4 and 6
85-92% of your maximum heart rate (MHR) or
91-99% of your heart rate at the anearobic threshold (AT)
Breathing begins to get more labored while pace is getting uncomfortable but doable for over an hour.

Here is some example graphical depictions of zone 3 workouts:

Step-up to zone 3 = Follow an interval pattern to adjust to new zone 3 intensity.  Add 1-2 minutes to each up-interval every week.


Higher fit = Adjust intensity of exercise to maintain work rate within Zone 3 for prescribed interval duration (5-45 minutes). Objective here is comfort at higher steady state. Benefits include improved power at moderate intensities, better fuel utilization, aerobic efficiency and some improvement in anaerobic threshold. 


Higher fit = Adjust intensity of exercise to maintain heart rate within Zone 3 for prescribed mileage/duration. Objective here is maintaining an appropriate tempo. Benefits include improved fuel utilization, increased muscle glycogen (stored energy) storage capacity, increased capacity for more intense workouts and improved aerobic efficiency.


Sample Zone 3 training sessions:


·     Running (these can be modified for use on the stair stepper, cross trainer and elliptical machines)

o    Keep heart rate in Zones 1-3 on a rolling course. 'PROUD' form. Allow heart rate to gradually rise to zone 3 as pace builds, but don't force it up.
o    Long repeats 1600 meters (1 mile) x 3 in zone 3 with recovery for the same time it takes to do repeats.
o    Tempo intervals (race pace)
-        ½ marathon = 400-2000 meters with equal time in recovery
-        Marathon = 800-3200 meters with equal time in recovery
o     Steady state intervals (40-60 min.) on road or with long steady climbs or tempo (race pace) workouts at ½ marathon pace.
o    Fartlek training for 30-40 minutes (2-4 intervals).
o    Crisscross threshold training. Choose a flat course. Warm-up and then run 20 minutes in Zone 3. Crisscross from high Zone 2 to Zone 3 every 1-2 minutes.
·     Cycling
o    Ride on rolling course. Big chain ring. Most of ride time in heart rate zone2-3. Seated on most hills.
o    Cruize intervals on road or trainer. Do 2-3 sets of 15-20 minutes in zone 3 with 2 minute recoveries. Smooth pedaling, 80-90 rpm’s, Aero position.
o    Threshold or Tempo ride for 25-60 minutes steady in zone 3. Non-stop. Smooth pedaling – 85-100 rpm’s.
o    Criss-cross threshold training. Choose a flat course. Warm-up and then ride 30-40 minutes in zone 3. Criss-cross from low zone 2 to high zone 3 every 2-3 minutes. 85-100 rpm’s.
o    Hilly course with long climbs. Stay in the heart rate Zones 2-4 on hills. No anaerobic. Do not force the effort on hills. Hold back some on climbs. Mostly seated on climbs. (May be done on indoor trainer.)

FINDING YOUR ZONES
If you are unable to get tested in the lab you can estimate your zones by going online to…

Lactate Threshold Tester (estimator) at http://www.fitstop-lab.com/tools/intensityindex.htm or 
I can help you set-up your zones online at http://www.fitstop-lab.com/CMSpro.htm


Saturday, July 14, 2012

Let's meet in the library

You can now breeze through a cool online library to access  some of my favorite “Training to Finish Strong” related information. There’s a new digital library online called Libreeze™ and I’ve joined up with them to create a collection of the online content that I find the most useful and valuable in our ongoing education on smart training at the Fit Stop Human Performance Lab.

My library will include tons of articles, videos, photos, and my own entire collection of blog posts. You’ll be able to browse, search, and find content that I recommend super easily. My collection will grow quickly because I’m constantly finding things that smart people have to say.

I hope you’ll find it useful. Let me know what you think – and do tell me if there are resources you use that you’d recommend I include. You may also decide you want to create your own library. You got to check it out.

To join me in the library click here.